Posted in Main Dish

Garlic Butter Steak Bites with Potatoes and Oregano

YES it’s been a while since my last post 🙂 The past few weeks have been crazy busy with my son’s 5th Birthday, relatives coming home to Manila from the US, Birthdays and other events to attend to and the list goes on 🙂

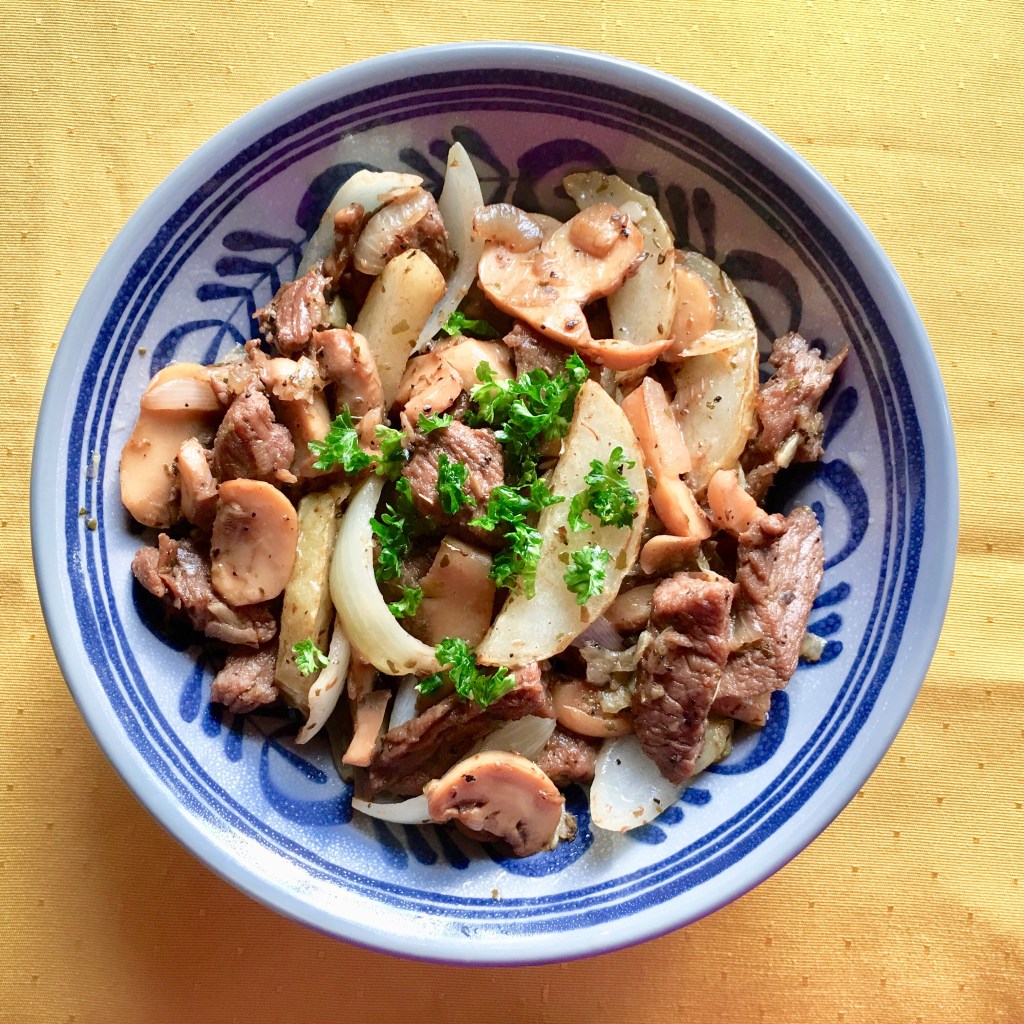
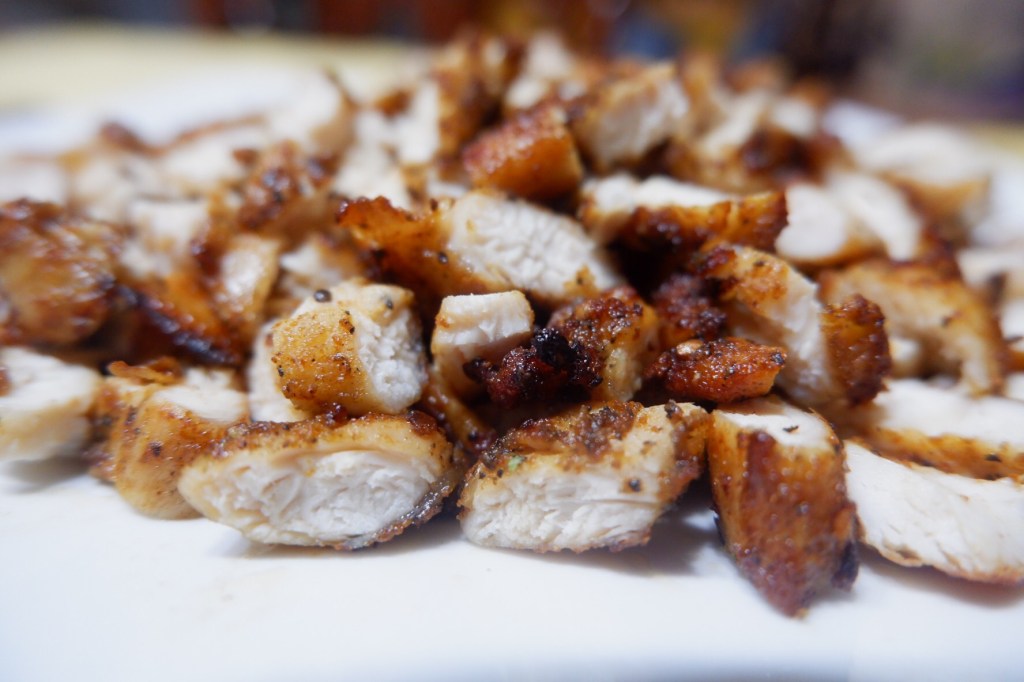
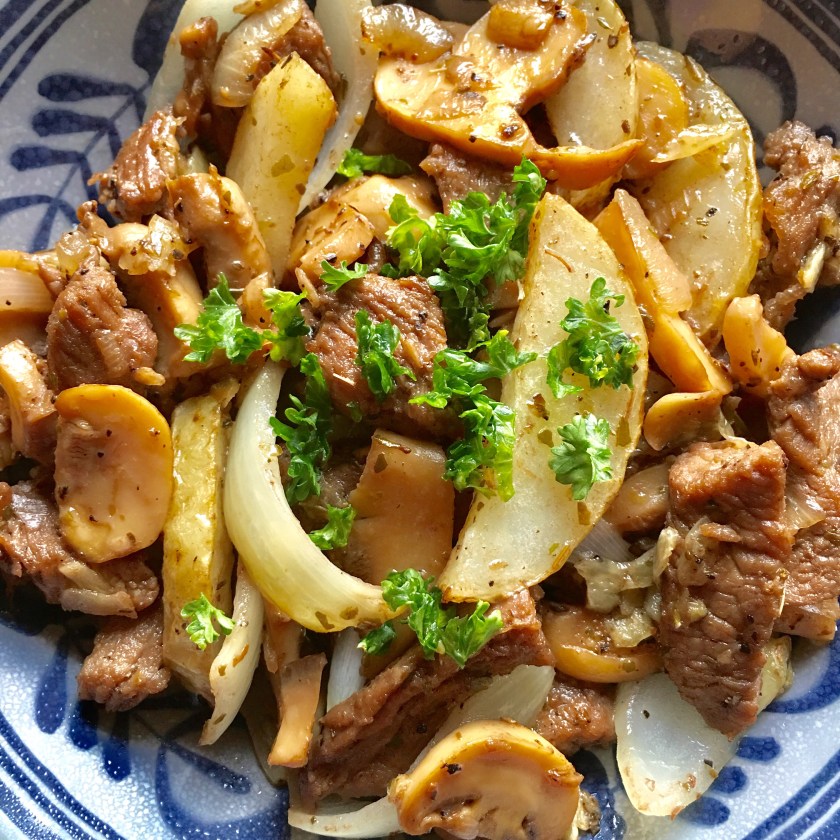
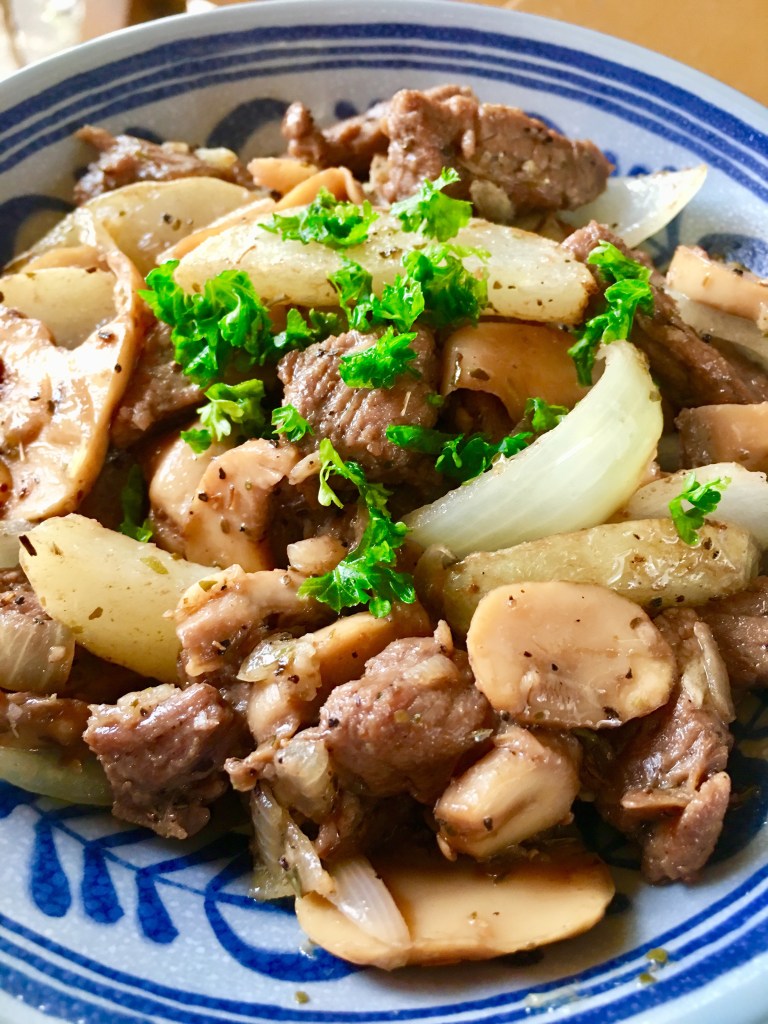
And now I’m back to share one of my experiment success recipes that I’ve been making for the past few months now as it became a regular family request. This recipe is absolutely restaurant worthy and I promise it’s NOT as difficult as it looks! You can definitely make it yourself! Beef tenderloin that melts in your mouth, herb potatoes that’s simply addicting to eat and a touch of oregano just amplifies the flavor -I mean c’mon what’s not to like! 🙂

Ingredients:

  • 1/4 kilo beef tenderloin diced
  • 1 large potato cut french fries style
  • 1 clove garlic minced
  • 1 white onion (half – minced & other half cut in thick slices)
  • 1 cup sliced mushroom
  • 3-4 tbsp olive oil
  • 1/4 butter
  • sugar to taste
  • 1 tsp oregano herb

for the beef marinade:

  • salt & pepper to taste
  • 2 tbsp oyster sauce
  • half tbsp fish sauce (optional)

Let’s start cooking:

  1. Marinate tenderloin cubes by seasoning with a little salt, generous amount of pepper, add oyster sauce and just a little fish sauce (you can skip the fish sauce if you don’t have this available). Mix well and set aside in the fridge.
  2. Start by frying the sliced potatoes on high heat. remove from oil when it’s already lightly crispy and set aside.
  3. On the same pan on low heat, fry garlic and immediately remove from oil just before it’s almost brown. Set aside to add later.
  4. Again on the same pan on medium-high heat, put butter and add minced onions, tenderloin bites and oregano herbs. Cook thoroughly and sprinkle a bit of sugar (I recommend brown sugar) just to balance the flavor.
  5. Later on, add mushrooms and other half of white onions (onions are added at the end to keep it crispy and sweet) and cook for just about 1-2 minutes. Turn off the heat and add your fried potatoes and fried garlic.
  6. Top it with parsley – serve and enjoy! 🙂
Posted in Mexican recipes

Chicken Quesadillas

Quesadillas is as delightful as a Burrito but less filling in the tummy, which means you can eat more than one serving! It involves uncomplicated cooking procedure and requires basic kitchen ingredients. All you need to do is just get up and make em’! 🙂

Ingredients:

  • 4 chicken breast fillet (cut into strips)
  • 12 small flour tortillas
  • 2 cups grated cheese (best to use Monterey Jack)
  • 1 pack taco seasoning
  • 1 large white onion cut to thin slices
  • 2 red peppers sliced to strips (green or yellow pepper is also good – you can mix for more color)
  • salt and pepper to taste
  • 1/3 cup olive oil
  • slice of butter (for toasting the tortilla)
  • cilantro for garnish

good for 6 persons

15 mins prep time

25 mins cook time

Easy Steps:

  • pat dry chicken fillet strips and season with salt, pepper and taco seasoning. (save about a teaspoon of taco seasoning for later). Leave it for about 5-10 minutes to let the chicken absorb all the flavor.
  • Heat 2-3 tbsp of olive oil in a pan over medium to high heat. Fry flavored chicken strips making sure both sides are well cooked. Make sure not to overcook as chicken meat will harden and dry out. When done cooking all the chicken, cut into bite sizes or cubes. Set aside.
  • Using the same pan, add a tbsp of olive oil and throw in all the sliced onion and red pepper. Add the remaining 1 tsp taco seasoning. Saute for just enough time to retain a bit of crunchiness. Take out from the pan and set aside.

Time to put it all together 🙂

Spread a little butter on a clean non-stick pan over low-medium heat. Place tortilla on the pan and start making your Quesadilla

  1. spread grated cheese
  2. Next layer it with onions and peppers
  3. add in your yummy chicken bites
  4. top it off with more cheese
  5. gather the other side of the tortilla to fold (tip: just put enough amount of each ingredient so it’s easy to fold or better, put the ingredients on one side of the tortilla for a more convenient way of folding)
  6. turn tortilla on the other side making sure both sides are brown and toasted to perfection! (optional: garnish with cilantro as you like)
  7. Serve with your favorite dip – sour cream, pico de gallo or eat as it is! 🙂

Posted in Asian Recipes, Japanese Recipes

Japanese Style Chicken Katsu

So instead of buying your toddler’s favorite chicken nuggets from a fast food or your local supermarket, why not make your own version – Japanese style! It’s actually fun to make, an activity that kids can join in to help plus the ingredients and steps are quite simple too. I surely had fun making AND eating it! LOL. This recipe below can also be followed if you’d like to make Pork Tonkatsu as the steps are the same . Serve it hot and crispy with a bowl of rice, some healthy steamed vegetables on the side like broccoli or baby corn and drizzle with some Tonkatsu sauce or Japanese mayo. Home cooked easy meals level up! 🙂

can serve up to 4 persons

prep time 15 mins

cooking time 20 mins

Simple Ingredients:

  • 4 pieces Chicken Breast fillet (cut each fillet diagonally or in half)
  • half cup all purpose flour
  • 2 large eggs (beaten)
  • 1 cup Panko (Japanese breadcrumbs)
  • salt and pepper to taste
  • cooking oil (I used palm oil to deep fry)

Steps:

  1. Pat dry chicken with a kitchen paper towel. Season chicken with salt and pepper on both sides and let it sit for about 10 minutes or so.
  2. Get 3 separate bowls for the flour, beaten eggs and panko. First, coat entire chicken breast in flour. Next, dip chicken in beaten egg making sure all parts are covered (I usually use tongs to do this so it won’t stick to my hands). Lastly, press into the panko crumbs until well coated.
  3. Heat oil in a skillet about half inch. When you see small bubbles are starting to appear, this means your oil is hot enough for deep frying.
  4. Place 3 pieces of chicken at a time to ensure quick cooking and less oil absorption. Give it about 3-4 minutes on each side until golden crispy brown.

*Homemade Tonkatsu sauce: mix 1 tbsp ketchup, 3 tbsp regular soy sauce, 1 tbsp oyster sauce, 1 tsp brown sugar

season with salt & pepper on both sides

flour > egg > panko

now we’re ready to fry!

because the chicken fillet is cut diagonally it should cook faster, so each side only needs a few minutes
crispy golden brown!

Also a great idea for baon (packed food) to school for your kids or work for you and your husband 🙂

Posted in Mexican recipes

Tasty Burritos

It is a fact that most of my hangry (hungry + angry) episodes in life have been resolved by a Burrito — this Tex-Mex dish in a wrapped tortilla (on the go food), with rice filling (surely fills a Pinoy belly!), involves stretchy, gooey cheese (who doesn’t love cheese? who?!) and has flavorful meat, beans and eaten best with sour cream, salsa or guacamole is definitely a bundle of love.

Burrito filling can have various ingredients, in fact it can be anything you want it to be! but for my recipe, I’m sticking to the basics. Now let me warn you that it may seem basic but the flavor is nothing near your ordinary Burrito. My mum who has 100% Filipino palate and ONLY gets food satisfaction from traditional Filipino food dishes, is in fact in love with this recipe. So with that, I rest my case 🙂

makes 6 wraps

prep time 10 mins

cook time 30 mins

Ingredients:

  • 6 pcs Tortilla wrap (12 inches)
  • 1 pound ground lean beef
  • 2 cups cooked rice (best to use rice from day before)
  • 1 pack Taco seasoning mix
  • 1 can refried beans
  • 1 cup shredded colby monterey jack cheese
  • 1 cup shredded cheddar cheese
  • 1 whole onion (thinly sliced)
  • 1 tbsp brown sugar
  • 3 tbsp olive oil
  • salt & pepper to taste
  • half cup Jalapeños (optional)
  • for the sides: get ready-made: salsa or guacamole or sour cream

Let’s get cookin’!

  1. Heat pan/skillet to medium, add a tbsp of olive oil and start frying the sliced onions. Once it becomes soft and a bit translucent you can now set aside for later.
  2. In the same pan (with all that onion flavor), add 2 tbsp olive oil and the lean ground beef, break them up whilst cooking and when it starts to brown, add in the taco seasoning (leave just about 1 tsp for the rice later) and then add the brown sugar. Season generously with salt and pepper then mix everything well. I recommend to thoroughly cook the meat until super well done. Then set aside.
  3. In a pan, cook refried beans for about 3-5 minutes, mixing it well while heating through. Set aside.
  4. In that same pan (with all the beans left to add flavor), cook rice and make sure to break it down to pieces, add in the taco seasoning leftover about 1 tsp, add your cooked onions. Season with a little salt. Mix and set aside.
Get your tortilla wraps ready coz’ it’s Time to assemble! 🙂

Spread refried beans onto one side of the tortilla > add just enough amount of spiced rice > throw in some ground beef > go crazy with the cheese > add in jalapeños for some heat (optional) > wrap your burrito making sure the sides are folded then roll up!

Heat your pan to medium and toast burritos to perfection. Cut burritos in half, prepare your salsa and sour cream on the side and ENJOY!

Posted in Pasta Recipes

Bacon Pesto Penne Pasta

5 Ingredients Challenge! 🙂

This has got to be the easiest and quickest pasta recipe I’ve done with the countless pasta dishes I’ve made in my lifetime. Giving in to the cooking shows I’ve been watching recently in using only 5 ingredients, I have got to vouch for this dish I made today for my husband’s baon (packed food) to work.

Can I just please say, it is BURSTING with flavor! Pasta recipes do not necessarily have to have a long list of ingredients to achieve that winner flavor. In fact, some of the Michelin star restaurants that features ‘must-try’ Pasta recipes literally has pasta + cream based sauce in it. It has nothing else. Period.

serves 1-2 persons

prep time 5-8 mins

cook time 12-15 mins

you only need 5 ingredients! (seriously)

  1. 4-5 strips Bacon cut into small pieces (best to use SMOKED bacon vs honey cured bacon)
  2. 200-250 grams Penne pasta
  3. 3-4 cloves garlic (finely minced)
  4. grated Parmesan cheese (1/3 cup)
  5. Pesto ready-mix (I used McCormick Pesto Pasta Sauce Mix – you’ll only need about 1 tbsp of this; no need to use the entire pack)

Delicious Pasta in no time! 🙂

  1. Bring water to a boil in a pot and add about half tbsp salt. Whilst waiting for water to boil, start heating up a pan in a separate stove on medium heat (saving time here!) and put in bacon to fry. No oil needed. The oil from the bacon fat will give your pasta all that yummy flavor!
  2. Time to place pasta in the boiling water for about 5 mins~ Mix every now and then to avoid pasta to stick together. Drain and set aside.
  3. Back to your bacon – as bacon cooks, add in garlic. You can actually throw in about half slice of butter if you already have that available to add creaminess to your pasta (this is optional). When garlic starts to toast/brown a bit, throw in all your pasta in the pan. Roughly mix.
  4. Add pesto. Add parmesan cheese. Add 2-3 tbsp water for moisture. Mix everything well and you’re DONE.
  5. Eat, enjoy and be proud of yourself! 🙂
Posted in Greek Recipes

Grilled Chicken Souvlaki with Yogurt Sauce

And my love for Greek food continues… 🙂 This Chicken Souvlaki recipe is fun to make, easy to do and satisfying to eat! Grilled chicken tenders marinated in garlic, lime juice, spices and herbs partnered with a fresh yogurt sauce – try something different than your usual dishes at home and surprise your loved ones with this winner recipe!

yields 10 sticks / serving 5 persons

Cook Time 15 mins

Prep Time 20 mins

What you will need:

For the CHICKEN SKEWERS:

  • 4 pieces Chicken breast fillet cut into cubes
  • 4 tbsp olive oil
  • 4 garlic cloves (grated or minced)
  • 3 tbsp lemon juice
  • 2 tbsp dried oregano
  • 2 tsp rock salt/kosher salt
  • 1 tsp black pepper
  • bamboo skewers (to be used later)

Combine all these ingredients in a bowl, mix well and put in the chicken cubes. Leave in the fridge to marinate for 30-40 minutes. You can add more olive oil as desired to help evenly grill the chicken later.

Prepare the yogurt sauce whilst chicken is still marinating

For the Yogurt Dip:

  • 1.5 cups greek yogurt
  • half cup finely minced cucumber (make sure not to include the seeds!)
  • 1 clove grated garlic
  • 1 tbsp lemon juice
  • minced parsley or dill (whichever you prefer)
  • salt (to taste)
  • pepper (to taste)

In a small bowl, combine greek yogurt, grated garlic, lemon juice, minced cucumber and roughly mix. Add salt and pepper to taste. Sprinkle with parsley and place in the fridge to set aside. (how easy was that!?)

Preparing to Grill:

Get your marinated chicken out of the fridge (after 40 mins~) and thread chicken cubes onto skewers. Whilst you’re on it, start heating your grill or grill pan.

Properly place skewers on the grill, best to do this in 2 batches (if let’s say you have 10 sticks). Let it cook on each side for 5 minutes or so until you achieve that tender smoky chicken perfection – do not overcook as this will dry out your chicken

Grab the yogurt sauce your prepared, arrange it with your hot off the grill chicken skewers and serve with pita bread OR hummus OR rice (because I’m Pinoy like that – rice is rice!) and ENJOY!

Posted in Mediterranean Recipes

Nutty, Tangy, Lemony HUMMUS Recipe

I couldn’t be prouder of my Hummus Recipe just because it tastes so legit! even better than what I’ve had in restos, quite frankly. It’s smooth, creamy, fluffy and just satisfying!

I absolutely love Mediterranean cuisine hence my go-to restaurant if the husband and I get into the never ending back and forth question, “So where do you want to eat?” is CYMA Greek Taverna. Everything in their menu is just bursting with flavor.

HUMMUS makes a wonderful snack or appetizer served with warm, chewy pita bread and fresh grilled veggies. Just perfect to dig in any time of the day!

Yield 3-4 cups

Prep Time 20 mins

Cook Time 30 mins

Ingredients:

  • 2 cans chickpeas (so you can set aside for movie night! or just for whenever you crave for it)
  • lemon juice from 3-4 pieces of lemon
  • 3-4 cloves garlic (grated is best)
  • 3-4 tbsp EVOO (extra virgin olive oil – ha! you learned that from me!)
  • 2 teaspoons baking soda (if you’re using chickpeas in a can)
  • salt to taste
  • 2-3 tsp cumin
  • paprika (for garnish)
  • finely chopped parsley (for garnish)
  • TAHINI (quick recipe below)
  • Pita Pockets (I bought mine from Village Gourmet)

Quick & Easy TAHINI Recipe: Toast 3/4 cup hulled sesame seeds (these are the lighter colored sesame seeds) in a pan sans oil. When it turns light brown, take them out of the pan and let it cool for 5 minutes or so. In a blender, throw in the toasted sesame seeds, blend until it turns soft and crumbly. Add 2-3 tbsp of olive oil until you get that consistency you want. Sprinkle with salt to taste and give it one last run on the blender. DONE! 🙂

Let’s make Hummus:

  1. Place chickpeas in a pan well enough to cover them with water. Add baking soda and bring it to a boil (about 20-25 minutes). Remove them from the heat when you see the skin is peeling off and bloated-looking. Drain them in a strainer and run cool water. Set aside.
  2. In a blender, mix together lemon juice, grated garlic and salt. Let it sit for a few minutes. Next, add in the tahini and cumin. Mix well until soft and creamy. Give it a taste to see if it needs more salt or if you want a bit more garlic in there.
  3. If your mixture gets too thick, add a few tablespoons of olive oil or water to balance the consistency.
  4. Lastly, add in the chickpeas in your blender. Run it a several times until you reach the smooth and creamy texture of that perfect Hummus. (you can always add a bit more of olive oil or water to smoothen the texture as appropriate)
  5. Prepare your Pita Pockets (quickly warm them in a pan). Place just the right amount of Hummus dip in a bowl, drizzle with a little bit of cumin (optional) and paprika then sprinkle with finely chopped parsley. Voi-la!
Smooth and Creamy Hummus made like a pro!

Posted in Asian Recipes, Pinoy Recipes

Crunchy Lumpiang Shanghai (Spring Rolls)

This is one of my 4-year old son’s favorite food! He loves Jollibee Lumpiang Shanghai so much that we literally buy it everyday after school for his lunch. I just had to make a healthier version since he loves it too much he can actually eat it everyday! 😉

Prep Time 20 minutes

Cook Time 10 minutes

Yield 35-40 pieces

What you need for the filling:

  • half kilo lean ground pork ( I used Australian 90% ground pork)
  • 150 grams shrimp (optional but recommended)
  • 2 carrots (finely diced)
  • 2 medium white onions (finely minced)
  • 1 stalk celery (finely diced)
  • half cup minced parsley
  • 1 1/2 tsp salt
  • 1 tsp ground black pepper
  • 1 tsp all purpose seasoning/garlic powder (optional for more flavor)
  • 2 tbsp brown sugar
  • 1 egg
  • 1/3 cup water
  • 1 1/2 tbsp all purpose flour

Other Ingredients:

  • Lumpia wrapper (I used Bambi Spring Roll Wrapper 35 pcs)
  • approx 3 cups of cooking oil (best to deep fry to get the right crispiness!)

How to make lumpia:

  1. Put all the filling ingredients in a large bowl and mix very well
  2. Get enough amount of lumpia mix about 1 spoon scoop and wrap ( I used egg white as glue for wrapper ends when rolling – this works really well)
  3. Heat oil. carefully place the spring rolls before it gets too hot. This way the meat inside gets thoroughly cooked without burning the wrappers
  4. Serve with sweet and sour sauce or mayo or ketchup! whichever dip you like 🙂

You can set aside the rest of the uncooked lumpia to keep in the fridge and cook the next day or 2 for baon or appetizer. Here’s what I did to the rest of the lumpia:

Posted in Pinoy Recipes

Pinoy Pork SISIG

It’s cheat day weekend!(or any day really) This is a shortcut version to making the famous sisig using Monterey Ready To Cook Frozen Pack. Below are the ingredients I used:

What to add to make it yummier 🙂

  • pepper (to taste)
  • salt (to taste)
  • 1 tbsp chicken liver spread
  • 2 tbsp soy sauce (or liquid seasoning for a more elevated flavor!)
  • 2 red onions (finely minced)
  • 1 piece finger chili pepper (sliced)
  • 2-3 pieces calamansi (Philippine lime)
  • 1 egg (optional)

Let’s get cooking!

  1. From the freezer, allow the sisig to thaw out completely, best if you leave it in the fridge to preserve the flavor
  2. No need to use oil as the fats of the pork will be used to cook itself. Get your pan hot and transfer over all the contents of Monterey Sisig
  3. Add salt and pepper to taste and also add half of your minced red onions as this will work up the flavor
  4. Cook it well for 10 minutes until the color becomes darker or until you notice that its starting to look chewy and crunchy! (oh yeah!)
  5. Add in the liver spread and soy sauce/liquid seasoning . Throw in the minced red onions and give it a good mix. Cook it for another 5 minutes or so.
  6. Serve in a fancy sizzling plate or small skillet and add in the green pepper slices for some heat. Squeeze calamansi extract all over and if you like, top it with egg.
  7. Partner with some iced cold beer, Netflix and enjoy! #YOLO
Posted in Asian Recipes

Honey Chicken with sesame seeds

This tasty recipe I made is sort of a fusion of Japanese, Chinese and Korean flavors. Safe to say this is an Asian style glazed chicken dish. It may require a bit more ingredients to amp up the flavor but really, it’s quite easy to make, easy to follow through and most of what you need is easily available in your local supermarkets. But what I can absolutely guarantee is — this recipe is DELICIOUS!!! Go and try it for yourself! And let me know what you think 🙂

prep time 20 mins

cook time 30 mins

Serves 5-6 people

what you’ll need for the chicken:
  • 4 chicken breast fillet (cut into bit sizes)
  • salt and pepper (to taste)
  • garlic salt (to taste)
  • 2 tbsp paprika
  • 3 eggs (lightly beaten)
  • 4-5 tbsp cornflour or cornstarch
  • 1 cup all purpose flour
  • lots of oil for deep frying (good to use healthy oil like olive oil or canola oil)
  • chopped scallions (for garnish)
  • sesame seeds (for garnish)

In a bowl, season your chicken with salt and pepper then set aside. Next, you’ll need 3 separate bowls: 1 for the slightly beaten eggs, another for the cornflour and finally another bowl for the all-purpose flour (in this bowl add in the garlic salt, paprika, a little pepper and mix). Just set all aside.

what you’ll need for the sauce:
  • 3 cloves garlic (finely minced)
  • 1 tbsp Chinese rice vinegar or white wine vinegar (if you do not have access to both, regular vinegar can work too!)
  • 2 tbsp sesame oil
  • 5 tbsp soy sauce
  • 2 1/2 tbsp honey (best if you’re using REAL honey not the flavored one for a more healthier meal)
  • 3 tbsp tomato ketchup (not banana ketchup for all you Filipinos out there)
  • 2 tbsp brown sugar
  • 1-2 tbsp chili sauce (however spicy you want it)

Add ALL of these ingredients in a bowl and MIX! set aside as you will use this later after frying all the chicken.

time to cook!
  • Prepare your all chicken for frying: first dredge in cornflour > next dip in egg wash making sure all parts are covered > last dredge in seasoned all purpose flour
  • Heat a good amount of oil in a large pan on high heat and when you see it starts to smoke a little then you know your oil is ready for frying
  • Lower your heat a little and carefully add in your chicken. Fry until crispy golden brown. Turn 2-3 times during cooking. Good to fry in batches to ensure the chicken is fully cooked.
  • Place chicken in a kitchen paper towel to absorb all those oil. Set aside.
  • SAUCE time! get a new clean pan. Add your prepared sauce, let it simmer and reduce for about 3 minutes. Once it bubbles and consistency becomes thick, add in all your crispy chicken and coat them all with your flavorful sauce
  • Finally sprinkle with chopped scallions and sesame seeds. You may eat as is or better, top it on a big steamy bowl of white rice. ENJOY!